


When it comes to creating a saddle-stitched booklet, the finish you choose plays a crucial role in the overall presentation and impact of your printed materials. Whether you’re designing a product catalog, event program, or marketing brochure, selecting the right finish is essential to ensure your booklet stands out and captures the attention of your audience. From understanding the basics of saddle stitching to evaluating different printing options, this article will guide you through the process of choosing the ideal finish for your saddle-stitched booklet.
Key Takeaways:
- Pick the appropriate paper stock for your saddle-stitched booklet, such as 100GSM laser, 150GSM satin, or 140GSM uncoated paper, to achieve the desired look and feel.
- Consider different paper finishes, including glossy, matte, and uncoated, to enhance the appearance of your saddle-stitched booklet and match your branding.
- Ensure that your artwork is set up correctly with the required bleed, margin, and resolution to achieve a professional and polished finish.
- Design your saddle-stitched booklet with a focus on balance, using images over text, sticking to existing branding, and considering the preferences of your target audience.
- Remember that saddle stitching is a popular binding method for small- to medium-sized booklets and offers durability and a professional appearance.
Understanding Saddle-Stitched Booklet Binding
The Basics of Saddle Stitching in Booklet Printing
Saddle stitching is a popular binding method used for booklets and magazines in the 8pp (printed pages) to 80pp range. It involves folding the pages in half and stapling them along the spine. This creates a secure and durable binding that allows the booklet to lay flat when opened.
When it comes to saddle stitching, choosing the right paper type and size is crucial. Three standard sizes are commonly offered for saddle stitched magazines and booklets: A4, A5, and DL. These sizes cater to different content requirements and serve various purposes.
Automated vs Traditional Stapling Techniques
There are two main methods of stapling in saddle stitching: automated stapling and traditional stapling. Automated stapling utilizes machines that handle the folding and stapling process, resulting in faster production times and increased efficiency. Traditional stapling, on the other hand, involves manual labor and is commonly used for smaller print runs.
Both automated and traditional stapling techniques have their advantages and limitations. Automated stapling offers faster turnarounds and is ideal for high-volume printing booklets. Traditional stapling, although slower, provides a more hands-on approach and is suitable for smaller quantities.
Double Knot Stitching and its Relevance to Saddle Stitch Booklets
Double knot stitching is a technique that reinforces the saddle stitching process, adding extra durability to the binding. This method involves tying double knots on the staples, creating a secure hold and preventing pages from coming loose.
Double knot stitching is especially relevant for saddle-stitched booklets with a higher page count. As the page count increases, the creep effect in the booklet also increases. Creep refers to the shifting of pages towards the center due to the folding and stacking process. To accommodate this, a minimum 5mm internal bleed is required to avoid notching on the spine.
Overall, saddle stitching offers a versatile and cost-effective binding solution for booklets and magazines. By understanding the basics of saddle stitching, the different stapling techniques, and the benefits of double knot stitching, you can make informed decisions when it comes to creating your saddle-stitched booklets.
Advantages of Choosing Saddle-Stitched Booklets for Your Printing Needs
When it comes to your printing needs, saddle-stitched booklets offer several advantages that make them an excellent choice. This cost-effective binding method uses two metal staples to hold the booklet together, providing a neat and professional finish. Whether you’re creating wall calendars, magazines, or catalogs, saddle stitching is a practical solution that ticks all the right boxes.
One of the standout advantages of saddle-stitched booklets is their cost-effectiveness. Compared to options like case, wire, or coil binding, saddle stitching is a more affordable choice, making it perfect for projects with limited funds. The technique requires minimal materials – just paper and wire staples – which contributes to its eco-friendly and inexpensive nature.
In addition to being budget-friendly, saddle-stitched booklets offer a quick turnaround time, making them ideal for projects that need to be completed rapidly. Whether you’re working on newsletters or brochures, saddle stitching ensures a extensive range of finished products that are delivered on time, keeping you ahead of schedule and meeting tight deadlines.
Another advantage of saddle-stitched booklets is their flat opening. With the pages lying flat, it becomes easier for readers to handle and read the materials. This feature enhances user-friendliness and is particularly useful for instruction manuals, workbooks, and catalogs where ease of use and readability are essential.
Saddle stitching is suitable for small to medium page counts, making it an excellent option for thicker documents that are not overly extensive. Its minimal weight and bulk characteristics keep shipping costs low, even for large quantities. This feature ensures that you can produce booklets with a neat and polished finish without compromising on transportation expenses.
Moreover, saddle-stitched booklets offer customization options that cater to specific branding and design requirements. You can choose from a wide range of paper types, finishes, and sizes to create a finished product that meets your desired aesthetic and content preferences. This flexibility allows you to create booklets that align perfectly with your brand’s image.
Finally, saddle-stitch binding provides a professional appearance. The discreetly secured spine with staples gives the bookbinding a clean and organized look, making it an excellent choice for various professional products such as booklets, catalogues, and brochures.
In conclusion, saddle-stitched booklets offer numerous advantages for your printing needs. Their cost-effectiveness, flat opening, quick turnaround time, and professional appearance make them a practical and budget-friendly option that delivers on both quality and efficiency. So, why settle for anything less when saddle-stitched booklets provide the perfect solution?
Saddle-Stitched Booklet: Assess Your Content and Purpose
Before diving into the specifics of printing options, it’s crucial to assess your content and purpose for the saddle-stitched booklet. By understanding the primary use of your booklet, evaluating the content, and considering audience preferences, you can create a highly effective and engaging end product.
Identifying Your Booklet’s Primary Use
Start by clearly identifying the primary use of your saddle-stitched booklet. Determine whether it will serve as a product catalog, event program, marketing brochure, or any other purpose. This will guide the overall design, layout, and content structure of your booklet.
For example, if you’re creating a product catalogue, you’ll need to prioritize high-quality imagery and product descriptions. On the other hand, an event program may require a schedule, speaker profiles, and relevant event information.
Content Evaluation for Optimal Page Layout
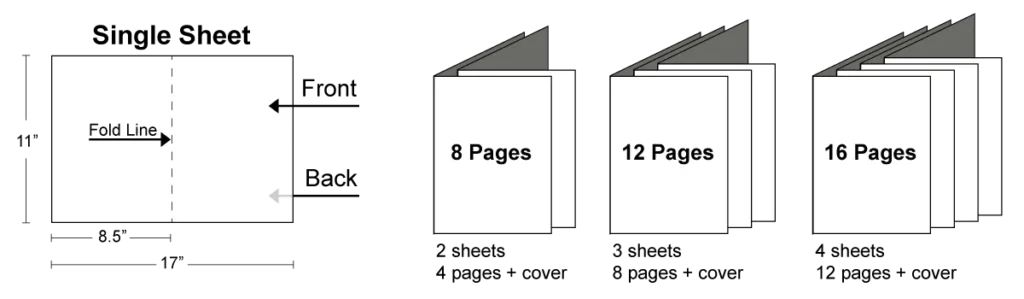
Once you’ve identified the primary use, it’s essential to evaluate your content for optimal page layout. Determine the amount of information you need to include and how it should be organized throughout the booklet. Remember that saddle-stitched booklets typically consist of pages in multiples of 4, such as 4, 8, 12, 16, 20, 24, etc.
Consider the hierarchy of information and prioritize the most important elements. Break down the content into sections and allocate pages accordingly. This will ensure a cohesive and easy-to-follow structure that effectively communicates your message.
Considering Audience Preferences in Your Design
When designing your saddle-stitched booklet, it’s vital to consider your target audience’s preferences. Think about their demographics, interests, and expectations. Tailor your design choices, such as color schemes, typography, and imagery, to resonate with your audience.
As an example, if your target audience is young, cool and trendy, you may opt for vibrant colors, bold typography, and contemporary imagery. On the other hand, a more conservative audience may prefer a classic color palette, elegant typography, and sophisticated imagery.
Take the time to research and understand your target audience’s preferences. This will help you create a visually appealing and engaging saddle-stitched booklet that effectively captures their attention and interest.
Selecting the Ideal Page Count in Saddle Stitch Booklets
When it comes to saddle stitch booklets, the page count is a crucial factor in determining the thickness and overall page layout. To ensure a well-constructed and visually appealing booklet, it’s important to consider the ideal page count for your project. Let’s explore the factors you need to keep in mind when selecting the page count for your saddle stitch booklet.
1. Structural Integrity
In order to maintain the structural integrity of your saddle stitch booklet, it’s recommended to have a page count between 8 and 76 pages. This range allows for a sturdy and durable booklet with cover printed that can withstand regular use and handling.
2. Accommodating Content
Consider the amount of content you intend to include in your bound booklets. A higher page count will enable you to incorporate more information, images, and graphics, providing a comprehensive and engaging reading experience for your audience. However, be cautious not to overload the booklet with excessive pages that may compromise readability.
3. Multiples of Four
Saddle stitching requires page counts in multiples of four to ensure proper alignment and distribution. This is due to the nature of folded sheets, which create four pages per sheet. Make sure your total page count is divisible by four to achieve a seamless binding process. Often a designer will add a number of blank pages to make this work.
4. Practical Recommendations
While the theoretical maximum page count for saddle-stitched booklets is around 120 pages, it’s important to note that a practical maximum of 60 pages is often recommended for optimal functionality and appearance. This recommendation is based on the use of 15 sheets of paper, each folded into 4 pages, resulting in 60 pages for thicker booklets.
5. Minimum Page Count
For a saddle-stitched booklet, the minimum page count is two folded sheets, resulting in an 8-page self-cover book or a 4-page plus cover book. This is the minimum requirement to ensure proper binding and functionality.
By considering these factors and aligning your page count with the recommended guidelines, you can create a well-balanced saddle stitch booklet that effectively showcases your content while maintaining a professional appearance.
| Page Count | Application |
|---|---|
| 8-76 pages | Common range for saddle stitch booklets |
| 2 folded sheets (8 pages) | Minimum page count for saddle stitch book |
| Multiple of four | Minimum requirement for proper binding |
| 60 pages | Recommended practical maximum for optimal functionality and appearance |
Deciding on Paper Stock and Cover Options
When it comes to creating a professional and visually appealing saddle-stitched booklet, choosing the right paper stock and cover options is crucial. The combination of these elements significantly impacts the overall quality and aesthetics of the final product. In this section, we will explore the differences between self cover and hard cover options, as well as the importance of understanding paper weight and texture for saddle-stitched booklets.
Choosing Between Self Cover and Hard Cover Options
Self cover and hard cover options offer distinct advantages for saddle-stitched booklets. Self cover, also known as a single stock cover, uses the same paper as the interior pages. This option provides a seamless and cohesive look, creating a unified design. On the other hand, hard cover options use a thicker and more durable cover material, such as card stock, which offers enhanced protection and a more premium feel.
The choice between self cover and hard cover depends on the desired level of durability and visual impact for your booklet. Self cover is suitable for booklets with fewer pages or those that require a more cost-effective solution. Hard cover, on the other hand, adds a touch of elegance and is ideal for booklets that require extra protection or that will be used as high-end marketing materials.
Understanding Paper Weight and Texture for Saddle-Stitched Booklets
Paper weight and texture play a significant role in the durability, appearance, and overall tactile experience of saddle-stitched booklets. The paper weight refers to the thickness and sturdiness of the paper, while texture describes the surface feel of the paper.
When choosing the paper weight, consider the number of pages in the booklet and the desired opacity. Booklets with fewer than 20 pages benefit from a recommended paper weight range of 128gsm lb to 150gsm. This heavier weight provides extra support and prevents transparency.
In terms of texture, you can choose between uncoated, gloss, and matte papers, each offering unique attributes. Uncoated paper is recommended for booklets intended to be written on and is a cost-effective option compared to other paper types. Gloss paper is ideal for designs with high color amounts, as it makes the colors stand out and gives a professional look. Matte paper is suitable for booklets that require a professional coated look, but with areas for writing or where gloss glare is not desired.
By understanding the nuances of paper weight and texture, you can select the right combination that aligns with the purpose of your saddle-stitched booklet. Remember, personal preference can also play a significant role in deciding the best paper type for your specific project.
The Role of Design Elements in Saddle-Stitched Booklets

Design elements play a crucial role in creating visually appealing and readable saddle-stitched booklets. When designing a professional and engaging booklet, it is important to consider various factors, including layout, typography, color schemes, and imagery. These elements contribute to the overall aesthetic and readability of the booklet, ensuring it captures the attention of your audience and effectively communicates your message.
The choice of layout is instrumental in guiding readers through the content of your saddle-stitched booklet. A well-structured layout ensures a logical flow of information and creates visual hierarchy, making it easier for readers to navigate and understand the content. By using clear headings, subheadings, and bullet points, you can enhance the readability and comprehension of your booklet.
Typography is another key design element that greatly influences the visual appeal and readability of your saddle-stitched booklet. Selecting appropriate fonts and font sizes that align with your branding and target audience is essential. Consistency in font choices throughout the booklet creates a cohesive and professional look, making the text more legible and enhancing the overall reading experience.
The color scheme you choose for your saddle-stitched booklet can greatly impact its visual appeal and convey the desired mood or message. Consider the psychology of colors and their associations to make informed design decisions. A harmonious color palette that reflects your brand identity can engage readers and make the booklet more memorable.
Imagery plays a significant role in capturing the attention of your audience and conveying information effectively. Incorporate high-resolution images and persuasive graphics that align with your content and enhance its visual appeal. Attention-grabbing visuals can break up long blocks of text, create visual interest, and evoke emotions, making your saddle-stitched booklet more engaging and memorable.
| Design Element | Role |
|---|---|
| Layout | Ensures logical flow and readability |
| Typography | Enhances visual appeal and legibility |
| Color Scheme | Conveys mood and reflects brand identity |
| Imagery | Captures attention and enhances engagement |
By effectively utilizing these design elements in your saddle-stitched booklet, you can create a visually appealing and readable end product that effectively communicates your message, captivates your audience, and leaves a lasting impression.
Opting for the Right Paper Type: Coated vs Uncoated
Choosing the right paper type for your saddle-stitched booklet is crucial to ensure the desired durability and aesthetics of the final product. When selecting the paper type, it’s important to consider the purpose and use of your booklet. Different paper types offer distinct advantages and are suitable for specific applications. In Australian, there is an extensive rang of stocks to be utilised in the printing process.
Matching Paper Type to Booklet Use
When it comes to booklet use, each project has unique requirements. Consider the content and purpose of your booklet to determine the ideal paper type.
For professional documents such as brochures, annual reports, or catalogs, coated paper is a popular choice. Coated paper provides a smooth and polished surface, enhancing the visual appeal and allowing for better ink adhesion. This makes it suitable for vibrant images, detailed graphics, and colorful designs.
On the other hand, uncoated paper offers a more natural and tactile feel, making it perfect for booklets with a more organic or rustic aesthetic. It is often preferred for newsletters, manuals, and brochures that require a softer look and feel. Uncoated paper also provides excellent readability for larger blocks of text.
Its Impact on Booklet Durability and Aesthetics
The choice between coated and uncoated paper types also influences the durability and aesthetics of your saddle-stitched booklet.
Coated paper provides greater protection against wear and tear, making it more resistant to smudges, scratches, and creases. This is particularly important for booklets that will be frequently handled or passed around. Additionally, the smooth finish of coated paper enhances the clarity and vibrancy of colors and images, resulting in a visually striking booklet.
Uncoated paper, while more susceptible to marks and fingerprints, offers a more natural and matte appearance. This can create a sense of authenticity and lend a unique tactile experience to your booklet. The softer texture of uncoated paper also provides a warm and approachable feel, appealing to certain audiences and brand aesthetics.
| Paper Type | Recommended Use | Durability | Aesthetics |
|---|---|---|---|
| Coated | Brochures, catalogs, vibrant designs | High | Polished, vibrant |
| Uncoated | Newsletters, manuals, brochures | Medium | Natural, tactile |
Setting Up Your Artwork for Saddle Stitch Booklet Printing
Ensuring Correct Bleed and Margin for Print
Proper artwork setup is essential for achieving a professional finish in saddle stitch booklet printing. One crucial aspect to consider is the correct bleed and margin. Bleed refers to the area outside the final trim size where your design extends to prevent any white edges. It is recommended to have a bleed distance of 3mm from all edges of the document.
In addition to bleed, adequate margins are crucial to avoid content loss during the binding process. It is recommended to leave a distance of at least 7mm between the edge of the document and important text or images. This ensures that nothing important is too close to the trim line and avoids any accidental cropping during the trimming process.
Artwork Tips for a Professional Finish
Aside from bleed and margin considerations, there are additional artwork tips you should keep in mind to achieve a professional finish in your saddle stitch booklet.
1. Resolution: To avoid pixelation in printing, it is crucial to ensure that images in your artwork have a resolution of 300 DPI. For text-heavy designs, consider using a resolution of 600 DPI for Photoshop to prevent text reduction.
2. Color Mode: As printing requires a different color mode than screens, it is important to use CMYK color mode in your artwork. RGB, which is suitable for screens, may result in color shifts when printed. Using CMYK ensures accurate color representation.
3. Fonts: To ensure correct font reproduction during printing, it is recommended to outline your fonts. This converts text into shapes, eliminating the need to have the exact font installed on the printing system. Additionally, embedding fonts in your artwork is also a good practice.
4. Margins for Staples: Considering the binding process, it is important to allocate space for staples in your design’s margins. This prevents any important content from being too close to the spine, where it may get lost during the binding process.
5. Proof reading and Review: Proof reading and thoroughly reviewing your content are essential steps to eliminate any typos or errors before finalizing the design. Take the time to go through your entire booklet multiple times to ensure everything is accurate and error-free.
By following these artwork tips and ensuring correct bleed and margin, you can achieve a professional finish and enhance the overall quality of your saddle stitch booklet.
| Statistics | Recommendations |
|---|---|
| Recommended resolution for artwork templates | 300dpi |
| Bleed distance recommended from all edges | 3mm |
| Recommended distance for text and images from the edge of the document | 7mm |
| Suggested distance to keep text from the gutter | at least 10mm |
| Inner paper weight recommendation to keep document flat and closed | under 200gsm |
| Checklist for exporting Saddle Stitched Brochure for print | Select Adobe PDF (print) from the drop-down menu Choose the PDF/X-4:2008 preset Ensure ‘use Document bleed settings’ box is checked Final PDF export should be triple-checked before printing |
Maximizing Visual Impact with Creative Booklet Design
When it comes to creating a saddle-stitched booklet, visual impact is key to capturing your audience’s attention and delivering a memorable reading experience. Creative booklet design plays a crucial role in achieving this goal, allowing you to showcase your branding, imagery, and engage your audience effectively.
To make the most of your saddle-stitched booklet’s visual impact, consider these tips:
- Focus on Branding: Incorporate your branding elements, such as logos, color schemes, and typography, consistently throughout the booklet. This creates a cohesive and professional look that reinforces your brand identity.
- Utilize Compelling Imagery: Images can speak louder than words and leave a lasting impression. Choose high-quality, visually striking images that complement your content and evoke the desired emotions in your audience.
- Design for Audience Engagement: Consider the preferences and needs of your target audience when designing your booklet. Craft layouts that make it easy for readers to navigate, with clear headings, subheadings, and visually appealing elements to promote engagement.
- Experiment with Layout: Play with different layouts and design elements to create visual interest. Use varying column widths, white space, and grid systems to guide the reader’s eye and create a visually engaging experience.
- Think Outside the Box: Don’t be afraid to be creative and innovative with your design choices. Experiment with unconventional shapes, unique folds, and interactive elements to surprise and delight your audience.
By incorporating these design strategies into your saddle-stitched booklet, you can maximize its visual impact and create a truly captivating piece that leaves a lasting impression on your readers.
| Saddle-Stitched Booklet Design Considerations | Jumbo Tri-Fold Brochure Design Considerations |
|---|---|
| Cost-effective for short print runs | Offers exceptional visual impact |
| Quick turnaround times | Ability to display large images and product lines |
| Design flexibility for visual impact | Potential use as a poster |
| Professional appearance and style |
When choosing between a saddle-stitched booklet and a jumbo tri-fold brochure, consider your product line and the desired level of visual impact and engagement needed in the final design. Both options offer unique benefits, and selecting the right one can make a significant difference in effectively communicating your message and captivating your audience.
Conclusion
Choosing the right finish for your saddle-stitched booklet is key to achieving a professional and visually appealing result. Saddle stitching offers a neat and compact binding method that is widely used for brochures, catalogs, and programs. It provides flexibility for various page counts, accommodating booklets with as few as 8 pages or as many as 64 pages.
When designing your saddle-stitched booklet, it is crucial to adhere to multiples of 4 in page layout to ensure proper alignment and eliminate the risk of blank or missing pages. Additionally, page creep can be a concern with high page counts, but can be addressed by adding extra margin space near the spine to prevent content loss.
Selecting the right paper stock is also essential for durability and aesthetics. For the binding process, a weight between 90 to 150 gsm is commonly recommended, while thicker paper between 128 to 150 gsm is preferred for the inner pages to provide stability and a premium feel. Proper margins, with an outer margin size of around 0.5 inches, ensure consistency and a professional appearance.
Overall, saddle-stitched booklets offer a cost-effective printing option suitable for a wide range of projects. With their clean finish, minimal setup costs, and wire staples binding for durability, they provide a professional look without breaking the budget. Whether you’re creating booklets, brochures, school diaries, or event programs, saddle stitching is a reliable choice. So why wait? Start creating your own professionally printed saddle-stitched booklets today with MVP Print!